
The eTrapp Condensate Treatment System will be installed by HVAC technicians that we refer to as Pros. It is plumbed into the condensate drain line output, and it can replace the common p-trap. eTrapp should be installed as close as possible to the air handler. A Pro needs to ensure that eTrapp can be installed on an HVAC unit beforehand; some HVAC units may not be able to support eTrapp as the unit generally requires 5 to 6 inches of clearance for proper installation.
The installation breaks down into three categories: plumbing, wiring, and, configuration.
Pre-Installation
- Clean the evaporator coil and pan.
- Make sure that the condensate drain has a 4-6% fall. That is, ensure that the unit is mounted level and the condensate lines downstream have sufficient fall to allow water to flow.
- Ensure that the condensate drain line is clear and free of debris.
- Make sure the HVAC air handler is using best practices.
- Locate a usable 110v outlet within 5 feet of the installation. Most standard codes require a power source within five feet of the air-conditioning unit.
- Wi-Fi or LoRa signal is required in the vicinity of the air handler. Obviously, Wi-Fi password is required.
Plumbing Installation Supplies
eTrapp sells exclusively through HVAC distribution outlets nationwide. It arrives in a pre-assembled package that includes the following:
- eTrapp Condensate Treatment unit
- One cartridge
- USB Adapter and power cord
- IoT Hub
- Water Sensor
- Zip ties
- Wire nuts
- Velcro strips
Other supplies required to complete the installation include:
- 3 1-inch male-to-¾-inch female PVC fittings
- ¾ inch PVC pipe
- ¾ inch coupling
- Teflon Tape
- PVC cutter
- PVC Glue or Pipe dope
- PVC primer
- Sandpaper
- Level
Plumbing Installation Instructions
The eTrapp inlet and outlet have standard 1-inch female npt threads, and most residential units will utilize ¾’’ fittings. If the installation is being performed on existing construction, disconnect the plumbing and cut out the p-trap. For residential applications a 1’’x3/4’’ reducing bushing will need to be fitted.
- Turn off power to the air conditioning unit.
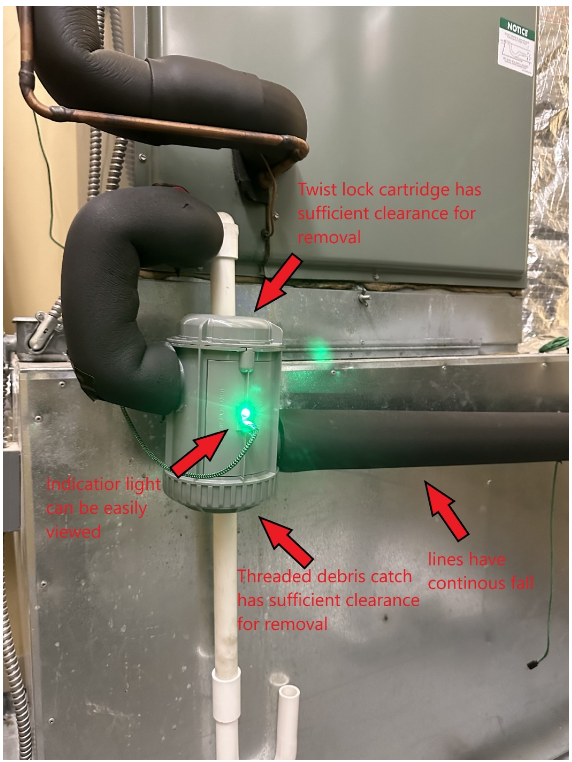
- Install eTrapp as close to the air handler as possible while being able to access the cartridge from the top and the debris clean-out basin on the bottom. Before gluing any fittings, ensure that both the threaded bottom and the twist lock cartridge (top) have enough clearance to be fully removed. Further, the light on eTrapp should face outwards to be easily viewed when replacing cartridges.
- Screw the fittings into the inlet and outlet of eTrapp. We recommend using Teflon tape to ensure a secure connection. Further, hand tighten the adapter then do a quarter turn by hand. DO NOT OVERTIGHTEN FITTINGS!
- Remove the existing drain pipe from the A/C unit. Then, install the new fitting into the A/C drain.
- Install pipe between the A/C’s fitting and the eTrapp’s inlet fitting. Additionally, rough the surface of the pipe with sandpaper and use primer then apply glue to ensure the best fit.
- Install a ¾ inch coupling on the downstream pipe.
- Repeating the inlet process, install pipe between the outlet fitting and the existing downstream drain pipe.
- Adjust for continuous drain fall; check the fall with a level and adjust the downstream pipe accordingly.
- Remove the protective seals from the cartridge as instructed and secure it into the eTrapp.
- Reinstall the insulation around the drain pipe.
- Install a vent between eTrapp and the p-trap if you do not remove the existing p-trap so that air pockets don’t form.
Optional Step
Generally, most residential A/C units feature two condensate outlet ports. Often the second port is unused and terminated with a plug. The terminated port sits slightly higher than the primary condensate outlet and only experiences condensate flow when the primary port becomes clogged. Therefore, installers may choose to plumb a down pipe with a u-bend to this secondary condensate drain. This optional step reroutes condensate directly to the external overflow pan in the unlikely event the primary line becomes clogged. Significantly, this step allows eTrapp’s pan sensor to immediately detect an overflow condition and respond. eTrapp’s water sensor functions if this step is not performed. However, the internal drain pan will have to fill and overflow into the external pan before detection.
Wiring Installation Considerations
The home owner monitors the system in real time through data provided by the eTrapp App available free of charge at the Apple App Store or the Google Play Store. The eTrapp App provides data on the condensate level, cartridge life, Wi-Fi or LoRa signal strength, ambient conditions, and more. Installation Pros receive data from each eTrapp they have installed in their respective territory via the Pro Portal. Furthermore, any eTrapp that is in alert status or may be due for a cartridge replacement prominently displays in the eTrapp Alerts segment of the portal. A Pro uses this data to proactively contact the homeowner to schedule a service call.
Wiring Installation Instructions
- Locate the nearest 110v outlet. Most standard codes require a power source within five feet of the air-conditioning unit. The USB-C power cable should be connected to the IoT Hub’s port marked with the power symbol. Next, connect the cable marked eTrapp to the female USB-C port below the indicator light on eTrapp. At this time, both the indicator light on eTrapp and the IoT hub should be illuminated.
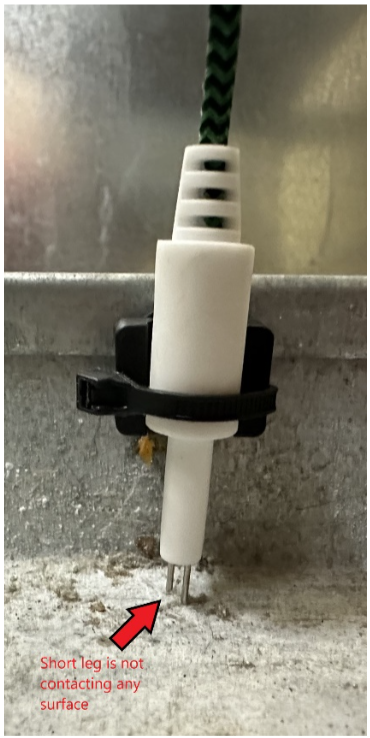
- Install the provided water sensor. The water sensor is shipped already installed on a magnetic mounting bracket. If your overflow pan is made from a non-ferrous material, you will need to remove the magnet and replace with the double-sided adhesive tape included in the small parts bag. Install the water sensor onto the side of the condensate overflow pan. The sensor’s longer leg should touch the floor of the drain pan and the short leg should not be in contact with any surface.
- Find a proper mounting location for the IoT Hub. Choose a smooth surface within reach of all of the attached cables and mount the IoT Hub using the provided adhesive-backed Velcro. The indicator light and text should face outward. While many installers mount directly to the side of the A/C unit, signal strength will be improved if a non-metallic mounting surface is available.
- The unit owner will then download the eTrapp App as previously instructed.
- The unit owner or installation Pro will then proceed to set up the app and connect eTrapp to their home or building Wi-Fi or LoRa.
- Once eTrapp connects to Wi-Fi or LoRa, the eTrapp’s owner sees a dashboard with information reflecting his or her eTrapp’s operational data which updates every five minutes. Then, the light on eTrapp will turn to blue once connected.
How To Provision eTrapp App
Click Register User at the bottom of the Login screen
Enter personal information and select your installation Pro (this allows the Pro to have access to the unit’s information which will alert the Pro to potential problems and to monitor cartridge life.
Scan the QR codes on the eTrapp and the cartridge
Connect the eTrapp to the local Wi-Fi
Additionally, as an added benefit for the installation professional, he or she will receive data from each eTrapp they have installed via the Pro Portal.
Optional Step
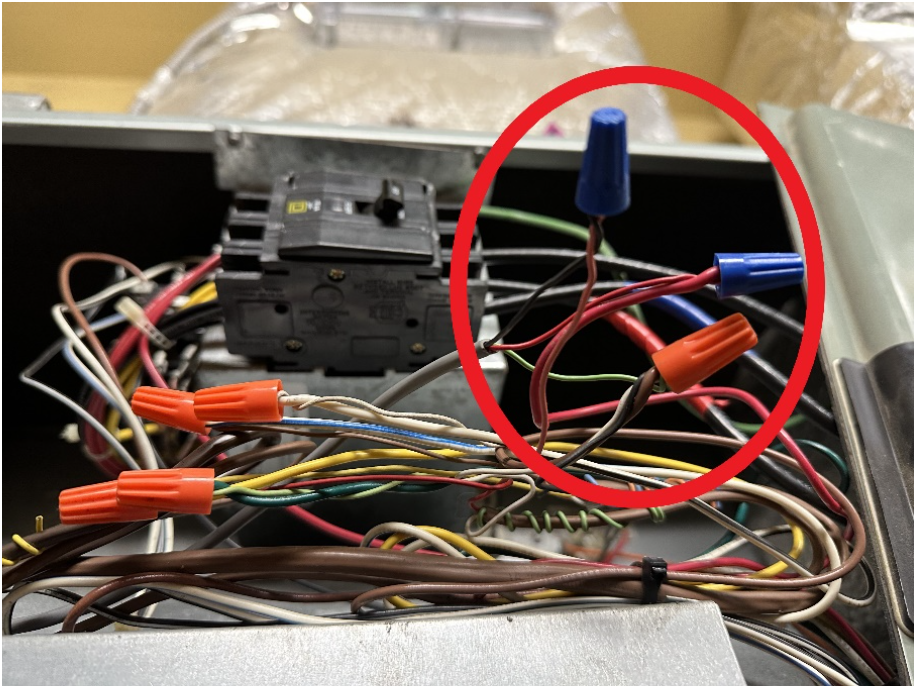
When the A/C cut-off cable is installed, eTrapp can shut down the A/C unit to prevent property damage when a flood condition is detected. This feature is optional, but highly recommended. If you choose not to utilize this feature, simply use a provided cable tie to bundle and secure the A/C cut-off cable. To install this feature, first shut down power to the A/C unit and locate where the thermostat wires tie into the air handler. Remove the wire nut or electrical connector attaching the 24V power supply from the A/C to the thermostat power (red). Connect the red cable from the A/C cutoff lead to the power supply wire and the black lead to the thermostat power wire. This will connect eTrapp’s IoT Hub in series with the thermostat. Additional wire connectors are provided in the small parts kit. Finally, connect the green wire to the thermostat common (white).
Get in Touch
Lastly, eTrapp’s parent company, eDelta, Inc., is available every step of the way in regards to providing support for the Pros as well as the unit owners. eDelta’s NOC (Network Operations Center) system maintains a database of all certified Pros and monitors every eTrapp’s performance. In this way, we intend to ensure the success of every eTrapp installed and thus earn the confidence of every unit owner.
Learn more about becoming an eTrapp Pro or get in touch with us for more information about the eTrapp system.