
eTrapp Installation Process
Before installing your first eTrapp, you are required to make a Pro Portal profile.
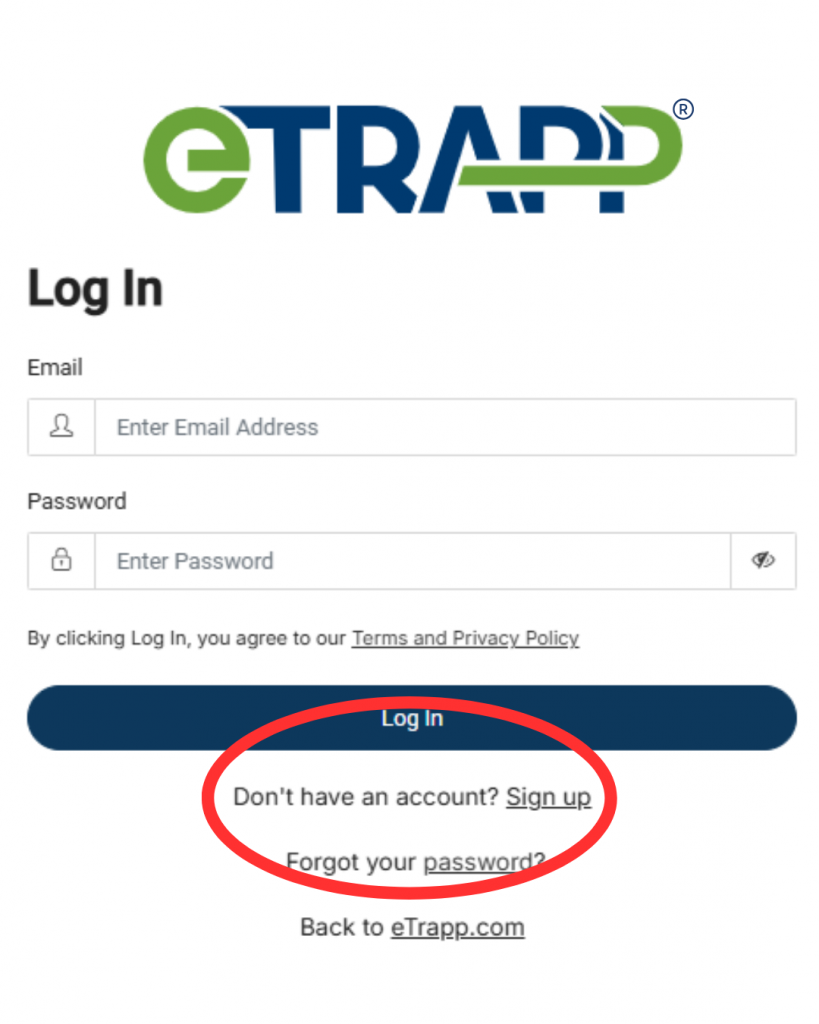
Navigate to the Pro Portal log in page which you can access at this link or by going to the Login page at the top right of the header menu on etrapp.com and selecting Pro Portal. If you don’t have an account yet, navigate to “Don’t have an account? Sign up” below the log in area. Input your information, and you will receive an email with a temporary password. Return to the login page and log in using your email and temporary password. You will be prompted to create a password and log in again.
Once in the Pro Portal, you will acknowledge the Installation Instructions before seeing your dashboard.
Registering Technicians
The tech will download the eTrapp Pro app available in the Apple App Store and Google Play Store free of charge. The tech will log in with the credentials in the email to gain access to the app’s dashboard.
How to Install eTrapp
This guide provides comprehensive instructions for installing an eTrapp Condensate Treatment System on a single unit. eTrapp Condensate Treatment System is designed for an average home-sized system (up to 7.5 tons). Please read through the entire guide before beginning the installation process.
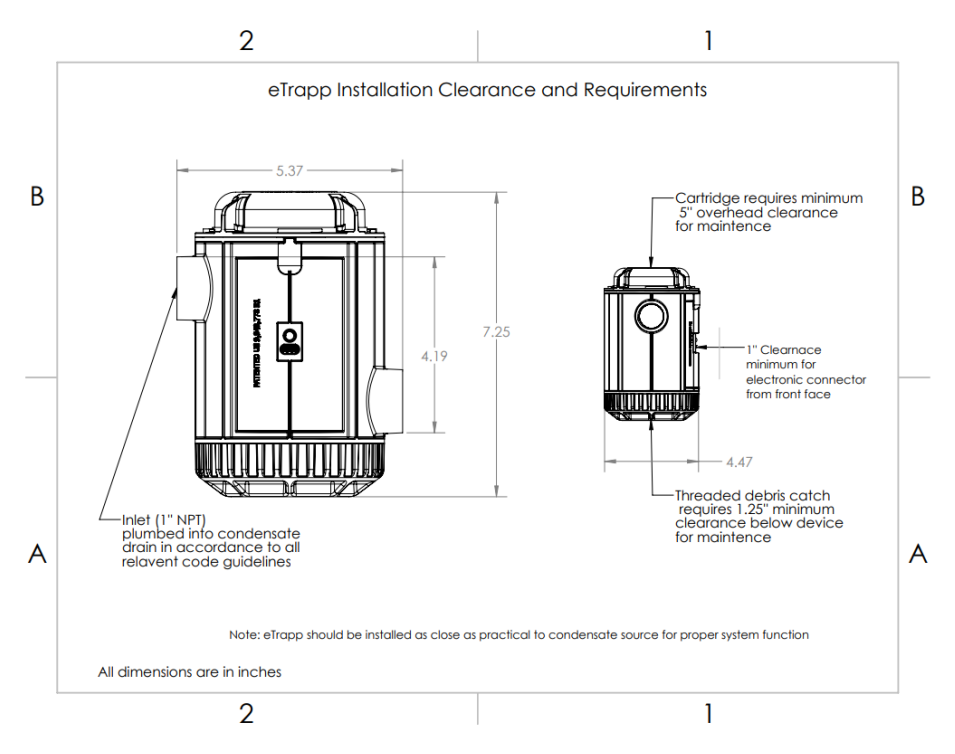
The eTrapp Condensate Treatment System is plumbed into the condensate drain line output. eTrapp should be installed as close as possible to the air handler. A Pro needs to ensure that eTrapp can be installed on an HVAC unit beforehand. The unit is 7.25 inches tall and 5.37 inches in diameter. This does not include fitments and piping. The downstream condensate line may need to be adjusted for a minimum 4-6% continuous fall.
eTrapp uses a proprietary chemical cartridge that is designed to last for about 6 months. When it is spent, it will need to be replaced. The cartridge requires a minimum of five inches of overhead clearance to be removed. Likewise, the bottom cap of the eTrapp unit can be screwed off to clear out any debris that entered the unit. This debris catch needs only 1.25 inches of clearance. Please note that if there is condensate liquid in the eTrapp when you remove the bottom cap, you will need to place something to catch the falling water.
The front side of the eTrapp unit features a light that either glows red indicating the cartridge is not locked into place or blue indicating that it is. Below the light is a USB-C port into which the power supply plugs. The front side needs a minimum of one inch clearance for this plug.
Use the Site Survey Form and the Clearance Requirements below to ensure that eTrapp is able to be installed at a location.
The installation breaks down into three categories: plumbing, wiring, and configuration.
Pre-Installation
- Clean the evaporator coil and pan.
- Make sure that the condensate drain has a 4-6% fall. That is, ensure that the unit is mounted level and the condensate lines downstream have sufficient fall to allow water to flow.
- Ensure that the condensate drain line is clear and free of debris.
- Make sure the HVAC air handler is using best practices.
- Locate a usable 110v outlet within 5 feet of the installation. Most standard codes require a power source within five feet of the air-conditioning unit.
- Wi-Fi or LoRa signal is required in the vicinity of the air handler. Obviously, Wi-Fi password is required.
Plumbing Installation Instructions
*Watch the plumbing installation process here: How to Install eTrapp Condensate Treatment System
Plumbing Installation Supplies
eTrapp arrives in a pre-assembled package that includes the following:
- 1 eTrapp Unit
- 1 Cartridge
- IoT Hub
- USB Power Cord
- USB Adapter
- Pan Flood Sensor
- Zip Ties
- Wire Nuts
- Velcro Strips
Other supplies required to complete the installation include:
- 3 1-inch male-to-¾-inch female PVC fittings
- ¾ inch PVC pipe
- ¾ inch coupling
- Teflon Tape
- PVC cutter
- PVC Glue or pipe dope
- PVC primer
- Sandpaper
- Level
The eTrapp inlet and outlet have standard 1-inch female npt threads, and most residential units will utilize ¾’’ fittings. If the installation is being performed on existing construction, disconnect the plumbing and cut out the p-trap. For residential applications a 1’’x3/4’’ reducing bushing will need to be fitted.

Please note that you should only hand-tighten fittings in the inlet and outlet of eTrapp. Tool tightening could cause cracks in PVC.
DO NOT OVERTIGHTEN!!
- Turn off power to the air conditioning unit.
- Install eTrapp as close to the air handler as possible while being able to access the cartridge from the top and the debris clean-out basin on the bottom. Before gluing any fittings, ensure that both the threaded bottom and the twist lock cartridge (top) have enough clearance to be fully removed. Further, the light on the eTrapp should face outwards to be easily viewed when replacing cartridges.
- Screw the fittings into the inlet and outlet of eTrapp. We recommend using Teflon tape to ensure a secure connection. Further, hand tighten the adapter then do a quarter turn by hand. DO NOT OVERTIGHTEN FITTINGS!
- Remove the existing drain pipe from the A/C unit. Then, install the new fitting into the A/C drain.
- Install pipe between the A/C’s fitting and the eTrapp’s inlet fitting. Additionally, rough the surface of the pipe with sandpaper and use primer then apply glue to ensure the best fit.
- Install a ¾ inch coupling on the downstream pipe.
- Repeating the inlet process, install pipe between the outlet fitting and the existing downstream drain pipe.
- Adjust for continuous drain fall; check the fall with a level and adjust the downstream pipe accordingly.
- Remove the protective seals from the cartridge as instructed and secure it into the eTrapp.
- Reinstall the insulation around the drain pipe.
- Install a vent between eTrapp and the existing p-trap if you do not remove the existing p-trap so that air pockets don’t form.
Generally, most residential A/C units feature two condensate outlet ports. Often the second port is unused and terminated with a plug. The terminated port sits slightly higher than the primary condensate outlet and only experiences condensate flow when the primary port becomes clogged. eDelta recommends installation a float switch in the secondary port that can run in series with the Pan Flood Sensor as an added layer of flood protection.
Wiring Installation Instructions
eTrapp’s sensor array transmits live data to the IoT Hub which sends data to the cloud and then to the eTrapp Apps and Pro Portal. The unit owner monitors the system in real time through data provided by the eTrapp App available free of charge at the Apple App Store or the Google Play Store. The eTrapp App provides data on the condensate level, cartridge life, Wi-Fi signal strength, ambient conditions, and more.
Installation Pros receive data from each eTrapp they have installed in their respective territory via the eTrapp Pro App and Pro Portal. Furthermore, any eTrapp that is in alert status or may be due for a cartridge replacement prominently displays in the eTrapp Alerts segment of the portal. A Pro uses this data to proactively contact the homeowner to schedule a service call.
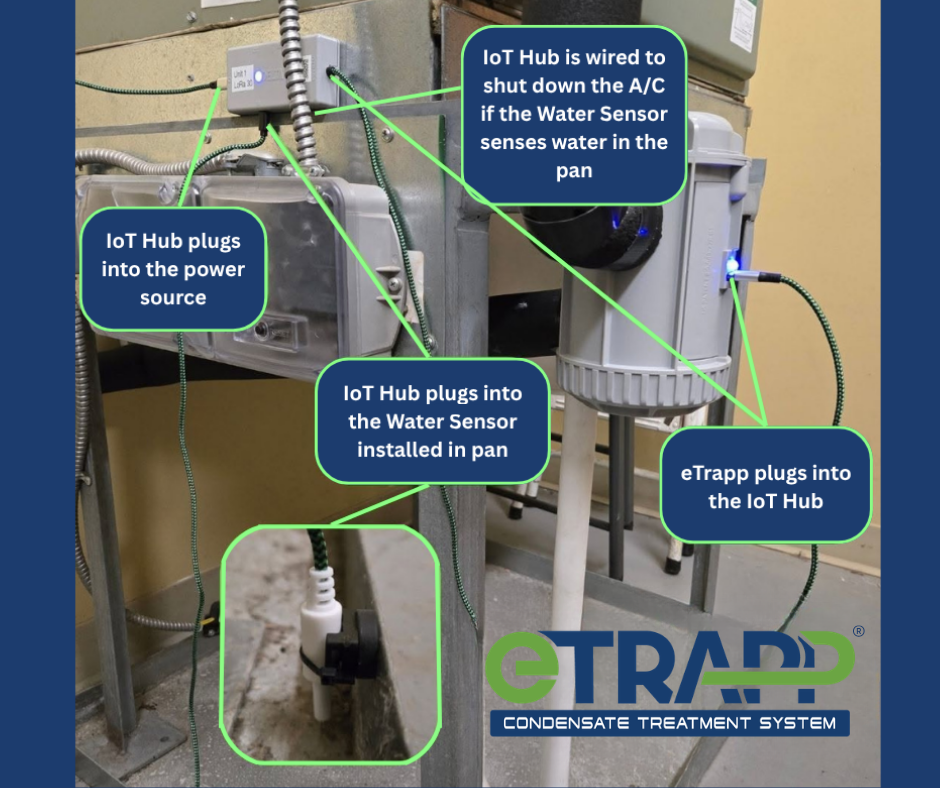
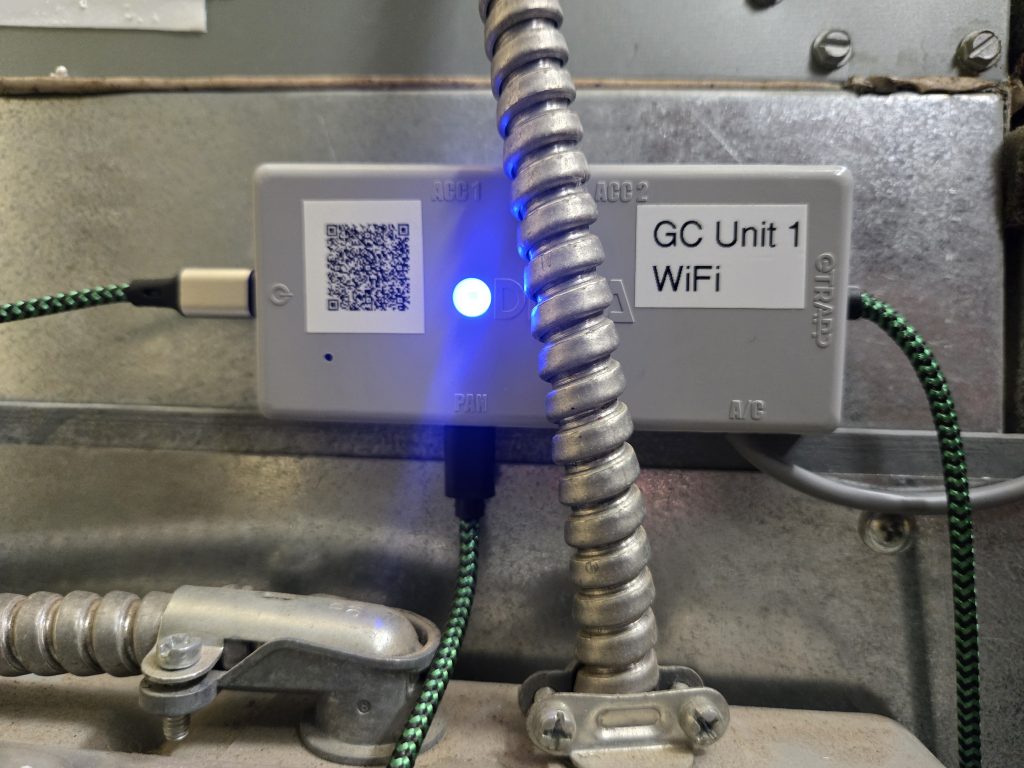
- Locate the nearest 110v outlet. Most standard codes require a power source within five feet of the air-conditioning unit. The USB-C power cable should be connected to the IoT Hub’s port marked with the power symbol. Next, connect the cable marked eTrapp to the female USB-C port below the indicator light on eTrapp. At this time, both the indicator light on eTrapp and the IoT Hub should be illuminated.
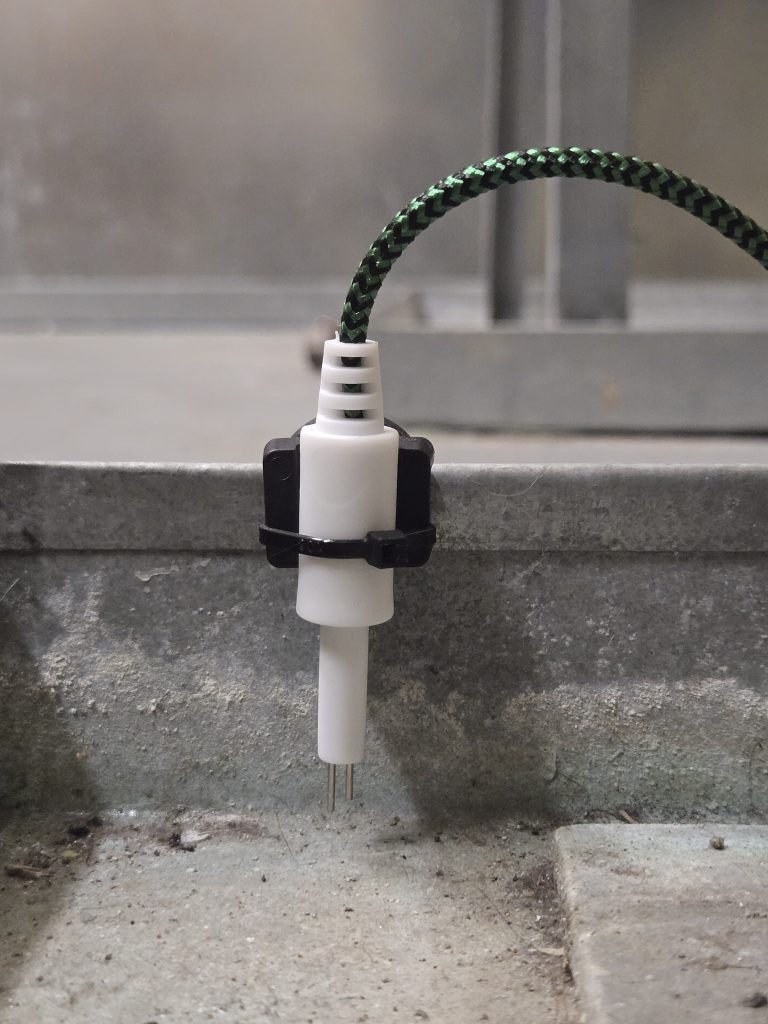
- Install the provided Pan Flood Sensor. The Pan Flood Sensor is shipped already installed on a magnetic mounting bracket. If your overflow pan is made from a non-ferrous material, you will need to remove the magnet and replace with the double-sided adhesive tape included in the small parts bag. Install the water sensor onto the side of the condensate overflow pan. The sensor’s longer leg should be about ¼ inch from the floor of the pan.
- Find a proper mounting location for the IoT Hub. Choose a smooth surface within reach of all of the attached cables and mount the IoT Hub using the provided adhesive-backed Velcro. The indicator light and text should face outward. While many installers mount directly to the side of the A/C unit, signal strength will be improved if a non-metallic mounting surface is available.
A/C System Shutoff
The eTrapp system features redundancies to prevent condensate overflow by cutting off the air conditioner. The unit owner and the Pro will be sent an A/C Cutoff Alert in this case, and the alert will be sent via email daily until the issue is resolved.
The eTrapp Condensate Treatment System is designed to prevent condensate line clogs of bacteria/fungi/algae, however, a condensate backflow could occur if the input line or catch basin become blocked by large amounts of debris or foreign material from the air-conditioning system.
If the condensate continues to backflow, the air conditioner’s primary pan float switch will be triggered to shut off the air conditioner. eDelta Inc. recommends this float switch if it’s not already required. Float switches should be checked on a regular basis to ensure it’s in proper working order. If the float switch is not triggered (or one is not installed) and condensate continues to backflow, eTrapp’s water sensor installed in the secondary/emergency pan will be triggered to cut off the air conditioner. These redundancies ensure that condensate backflow will not cause a flooding event.
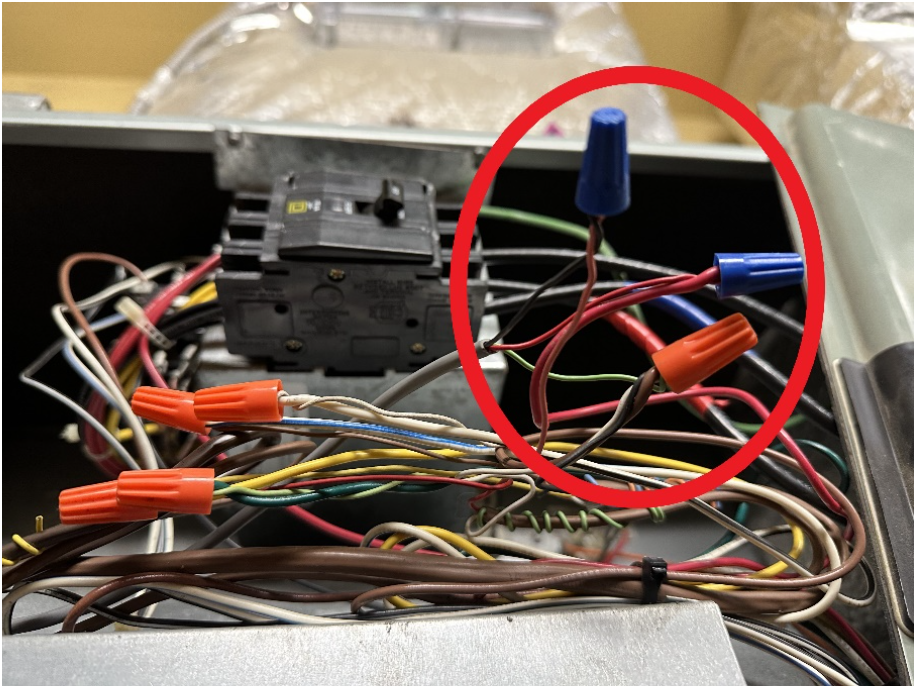
To install this feature, first shut down power to the A/C unit and locate where the thermostat wires tie into the air handler. Remove the wire nut or electrical connector attaching the 24V power supply from the A/C to the thermostat power (red). Connect the red cable from the A/C cutoff lead to the power supply wire and the black lead to the thermostat power wire. This will connect eTrapp’s IoT Hub in series with the thermostat. Additional wire connectors are provided in the small parts kit. Finally, connect the green wire to the thermostat common (white).
How To Connect eTrapp to the App (Unit Owner/End User App)
*Watch How to Provision eTrapp here: How to Provision eTrapp
- Log into the eTrapp Pro App using the credentials created in the Pro Portal
- Click on the ‘Provision New eTrapp” tab and click Create New Customer. Follow the prompts to enter customer information (this will send the customer a link to download their eTrapp App)
- Scan the QR codes on the eTrapp and the cartridge
- Connect the eTrapp to the local Wi-Fi or LoRa
- The blue LED on the IoT Hub unit will flash four times (repeatedly) when successfully connected to a Wi-Fi network. When successfully connected to a LoRa network, the blue LED will flash five times (repeatedly). Once eTrapp successfully connects to Wi-Fi or LoRa, data will begin being transmitted to the apps and Pro Portal.
As an added benefit for the installation professional, he or she will receive data from each eTrapp they have installed via the ProPortal.
Final Checklist
- Verify cartridge lock indication LED is blue.
AFTER PLUMBING IS COMPLETED AND CARTLOCK LED IS BLUE, START THE AC UNIT SO THAT WATERLEVEL IS INCREASING WHILE PERFORMING THE FOLLOWING TESTS: - Pan Flood/AC-cutoff Verification
– Dip Pan Flood Sensor in water
– Verify app’s Pan Flood icon to toggle (this should be nearly immediate)
If AC-cutoff installed:
– verify HVAC unit powers down
– verify mobile app’s Pan Flood icon to toggle (this should be nearly immediate)
– Dry the sensor and verify the HVAC unit starts running again - Wi-Fi signal strength verification
– On mobile app, verify as 70% or higher - General Plumbing/Install Verification
– Water level should noticeably increase within minutes of starting the HVAC unit
– Verify water level stabilizes at 50% or higher
eTrapp Cartridge Replacement
*Watch How to Replace eTrapp Cartridge here: How to Change the eTrapp Cartridge
eTrapp cartridges are designed to last for 180 days (6 months). Notifications to schedule a service to replace the cartridge will be sent through the eTrapp App and Pro Portal at 45 days remaining, 30 days remaining, 15 days remaining, and 7 days remaining. Replacing the cartridge takes just a few minutes.
The Pro will arrive at the client’s home or office with a new cartridge.
- Remove shrinkwrap and plastic seal from the new cartridge.
- Open eTrapp Pro App, click on cartridge or click on “Replace Cartridge.”
- Following the prompts in the app, scan the QR code on the new cartridge.
- Click “Submit”
- Unscrew and remove the old cartridge and replace it with the new cartridge.
- Screw in the new cartridge until the red light turns blue.
- The app will show 100% life for the new cartridge.
More information about eTrapp Condensate Treatment System is available in the eTrapp Resource Guide here: https://etrapp.com/etrapp-resource-guide/.